
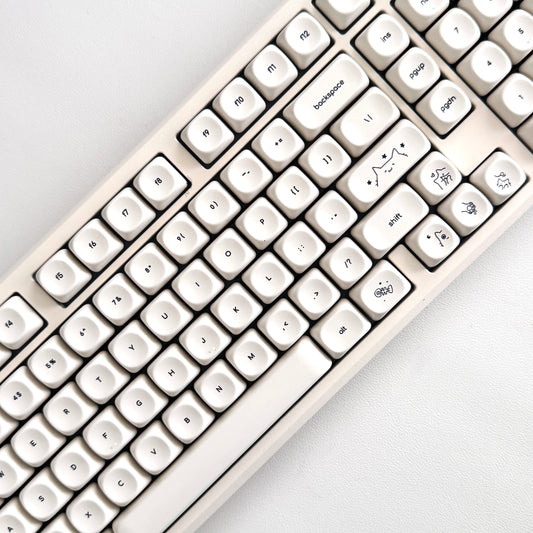
A Guide to the Compact Pro 67 Keyboard
need support?
frequently asked questions
Can I game on a 65% keyboard?
Yes. Most games use WASD and nearby keys, all present on 65% layouts. Arrow keys are accessible, and you can program gaming-specific macros to any key combination.
How do I access F-keys without a function row?
Hold FN and press the corresponding number key. FN + 1 = F1, FN + 2 = F2, etc. After a few days, this becomes automatic muscle memory.
Are 65% keyboards good for long nails?
Excellent for long nails. The compact layout reduces reaching, keeps your hands centered, and maintains consistent nail-to-key angles. Less stretching means cleaner actuation and reduced stress on nail extensions.
What about arrow keys for coding?
65% keyboards include dedicated arrow keys - no function layer required. Perfect for navigating code, selecting text, and moving through terminal commands. Unlike 60% boards, you get immediate arrow access without memorizing key combinations.
Is 65% too small for productivity work?
For focused work, 65% often increases productivity by keeping everything in reach. The learning curve is 3-7 days. Once mastered, most users find they're faster than on full-size boards because hands stay positioned over home row.
Can I use 65% keyboards for spreadsheets without a numpad?
Yes. Top row numbers work fine for light data entry. For heavy spreadsheet work, consider adding a separate USB numpad that you position exactly where needed, then remove when not in use.
What's the difference between 60% and 65% keyboards?
65% adds dedicated arrow keys and a few extra keys (typically Del, Page Up/Down) without requiring function layers. The tradeoff is slightly larger footprint. 60% is more compact, 65% is more convenient for navigation-heavy workflows.
Do 65% keyboards work with both Mac and Windows?
Yes. Most 65% keyboards support both operating systems. You may need to swap keycaps or adjust keymapping via software, but functionality remains identical across platforms.
How long does it take to adjust to 60% from full-size?
Most users adjust within 3-7 days. Day 1-2 feels frustrating. Days 3-5 start feeling natural. By week 2, full-size keyboards feel unnecessarily large. The key is committing fully rather than switching back and forth.
Are wireless 65% keyboards reliable for professional work?
Modern wireless 65% keyboards offer 2.4GHz dongles with 1-3ms latency, indistinguishable from wired. Bluetooth adds slight latency (8-15ms) but remains fine for coding and productivity. Battery life typically exceeds 40 hours with RGB enabled.
Will this work with Figma/Adobe/Sketch shortcuts?
Yes. All modifier keys present. Custom shortcuts work identically to full-size boards. Function layer provides access to F-keys for application-specific commands.
Can I remap the knob function?
Not on our mechanical frame boards. The knob is hardware-dedicated to volume control. RGB adjustments via FN layer combinations.
What does the volume knob control?
Volume only. Turn to adjust, press to mute. RGB controls are FN + arrow combinations. Simple, immediate, tactile.
FN key blinking white - what does it mean?
White blinking indicates pairing mode. This happens when you've pressed FN + Q/W/E to pair a Bluetooth device, the keyboard lost connection, or battery is critically low (under 10%). Complete pairing in your device settings, press any key to wake, or charge for 15-20 minutes. Factory reset: Hold FN + BACKSPACE for 5 seconds.
How long does the battery last?
Approximately 48 hours with RGB enabled, 200+ hours with RGB disabled. Battery life varies based on RGB brightness and connection mode.
Can I use this while charging?
Yes, connect USB-C cable and continue typing. Charging takes approximately 3 hours to full capacity.
How many devices can I pair?
Three Bluetooth devices (FN + Q/W/E). Switch between them instantly using the same key combinations.
Does this work with iPad/Android tablets?
Yes, connects via Bluetooth or USB-C (with compatible adapter) to any device supporting external keyboards.
What's the difference between wired and 2.4GHz modes?
Wired provides unlimited power and zero battery concerns. 2.4GHz offers wireless freedom with gaming-grade latency (typically 1-3ms). Bluetooth adds multi-device switching but slightly higher latency (8-15ms).
Long nail compatibility?
Excellent. Centered hand position, consistent actuation angles, and knob control accommodate nail length naturally. Less reaching, cleaner typing.
Creamy Keycaps & Wireless Keyboards
-
The Ultra Violet キーボード - Series 06
通常価格 $340.00 USDから通常価格$280.00 USDセール価格 $340.00 USDから -
The Ultra Violet キーボード - Series 06
通常価格 $195.00 USDから通常価格$280.00 USDセール価格 $195.00 USDからセール -
The Ultra Violet キーボード - Series 06
通常価格 $195.00 USDから通常価格$280.00 USDセール価格 $195.00 USDからセール -
The Atlas Keyboard • Series 05
通常価格 $195.00 USDから通常価格$280.00 USDセール価格 $195.00 USDからセール


companions for the keys.
40oz of stainless steel, engraved one at a time. Four colorways, four moods.
-

All Substance · Cream
通常価格 $60.00 -

House of Thock · Powder Blue
セール価格 $45.00 通常価格$60.00セール -

Keys Open Doors · Lilac
セール価格 $45.00 通常価格$60.00セール -
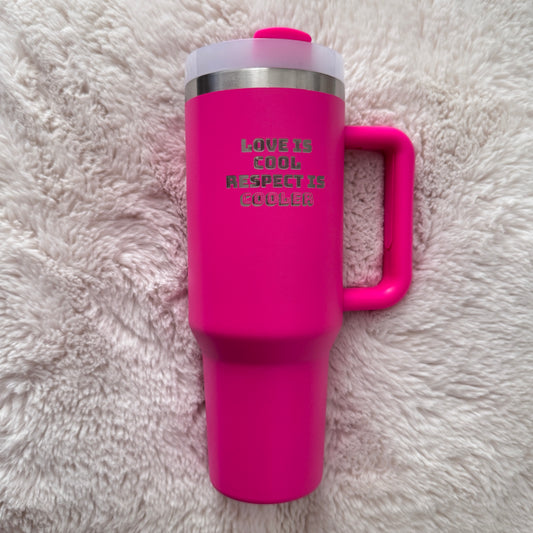
Love Is Cool · Hot Pink
セール価格 $45.00 通常価格$60.00セール


